Azure DevOps Services Integration
The Azure DevOps Services integration lets you synchronize your API definition, auto-generated server code, or client SDK with an existing Git repository in Azure DevOps Services (formerly Visual Studio Team Services or VSTS). Every time you save your API in API Hub for Design, the integration will update the code in the specified repository.
The integration supports both https://dev.azure.com/ORG_NAME and https://ORG_NAME.visualstudio.com accounts.
Supported versions
This integration works with Microsoft’s SaaS platform, Azure DevOps Services. If you use a self-hosted Azure DevOps Server or Team Foundation Server (TFS), use the Azure DevOps Server (TFS Sync) integration instead, which is available in SwaggerHub On-Premise.
The integration supports Git repositories only. Team Foundation Version Control (TFVC) repositories are not supported.
Considerations
This integration supports OpenAPI 2.0 and OpenAPI 3.0.
The target repository must not be empty, it must contain, for example, a README or .gitignore file.
The synchronization is one-way, which means your API definitions go only from API Hub for Design to Azure DevOps Services. You should edit your API definitions in API Hub for Design only.
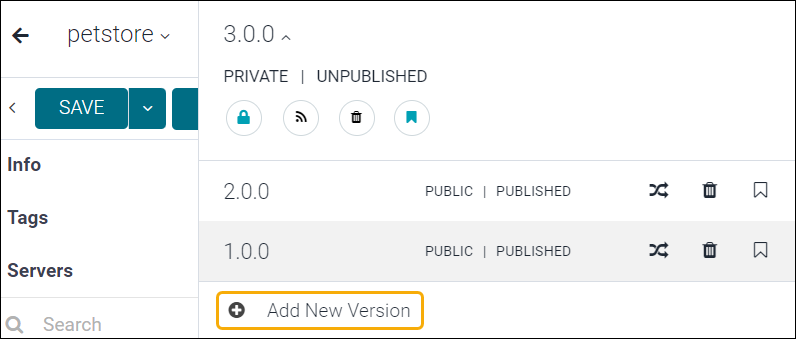
The integration is bound to a specific version of the API and is not copied when you add a new version. To generate code for different versions, add the integration to each version separately.
Generate an access token
API Hub for Design needs an access token to connect to your Azure DevOps Services instance. To generate this token:
Log in to the Azure DevOps Services web portal as a user who has access to the target repository. This user will be used later to set up the integration. You can use your own account or a service account.
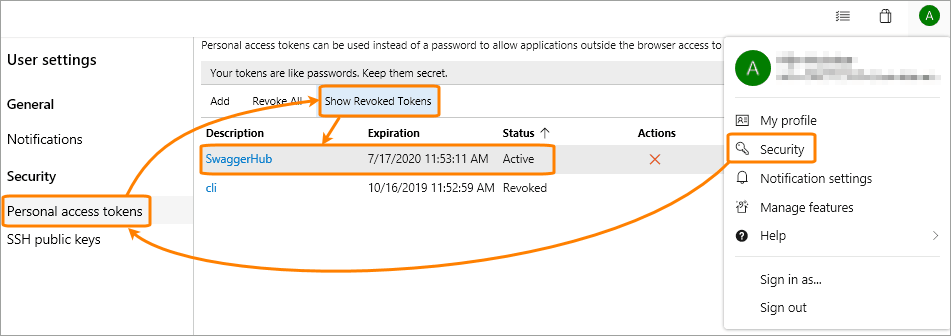
Click your profile photo and select Security.
Select Personal access token.
Click New Token.
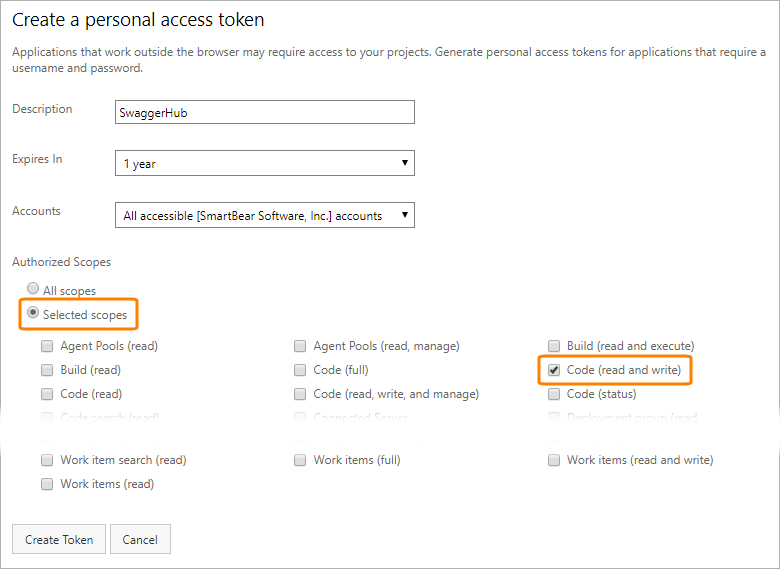
Enter a name for this token and select the expiration date.
From the Organization list, select the organization that contains the target repository for the integration, or select All accessible organizations to create a multi-organization access token.
Under Scopes, select Code > Read & write.

Click Create.
Make sure to copy the token to a secure place because you will not see it again.
Important
Keep in mind that the access token has an expiration date. Shortly before the token expires, you will need to update the token in the API Hub for Design integration settings. We recommend that you set a calendar reminder to update the token before it expires.
Configure the integration
To set up or change the Azure DevOps Services integration, you must be the owner of an API.
Follow these steps:
Open your API in the API Hub for Design editor.
If the API has several versions, select the version you want to synchronize with your repository in Azure DevOps Services.

Click the API name to open the API Info panel.
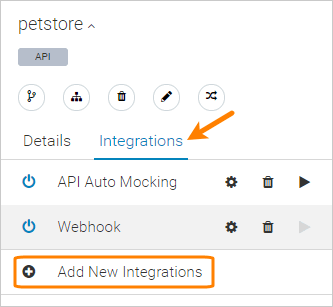
In the API Info panel, switch to the Integrations tab, and click Add New Integrations.

Select Azure DevOps Services from the list of integrations.
Specify the integration parameters:
Name – Required. A display name for the integration.
Organization – The Azure DevOps organization that contains the target repository. You can view a list of your organizations at https://aex.dev.azure.com/me. Enter the organization name without the dev.azure.com or .visualstudio.com part. For example, if your account is dev.azure.com/my-org or my-org.visualstudio.com, enter just my-org.
Personal Access Token – The access token that you generated earlier. The token must have the Code (read and write) scope.
Project – Select the team project that contains the target Git repository.
Repository – Select the repository to push the code to. This repository must not be empty. It must contain at least one commit, for example, a README or .gitignore file.
Sync Method – Select the synchronization type:
Sync method
Description
Basic Sync
API Hub for Design will manage all files in the specified branch and folder: new files will be added, existing files will be overwritten, and unused files will be deleted.
Advanced Sync
Similar to Basic Sync, but you can specify which files will be overwritten or ignored. Use this method if the output folder contains existing files that you want to keep.
Branch – Required. The repository branch to push the code to. If this branch does not exist, it will be created based on the repository’s default branch.
Generated API Code – Required. Select what you want to generate: server code, client SDK, API documentation, or the OpenAPI definition itself as YAML or JSON. See here for a list of supported languages and frameworks.
Tip
To customize code generation options, such as package names, use the Export > Codegen Options menu in the API Hub for Design editor. See Code Generation Options for details.
Output Folder – The output folder for the generated code, relative to the repository root. For example, server or sdk/android. If this folder does not exist, it will be created. If the output folder is not specified, API Hub for Design will create files and folders in the repository root.
Important
Use forward slashes (
/) as path separators:folder/subfolder1/subfolder2 – Correct
folder\subfolder1\subfolder2 – Incorrect
Paths – Available only if you selected Advanced Sync. Use these options to control which files and folders will be created, updated, deleted, or ignored during synchronization. All the paths are relative to the Output Folder. You need to specify either Partially Managed Paths or Fully Managed Paths.
Partially Managed Paths – These files and folders will be created if they do not exist, but the existing files and folders will not be modified. The wildcard
*indicates all files and folders in the Output Folder.Fully Managed Paths – These files and folders will be completely managed by the integration: new files will be added, the existing files will be overwritten, and the files that are no longer used will be deleted. You can use
*as a wildcard for all files.Ignored Paths – These files and folders will remain as is and will not be changed in any way.
Important
Use forward slashes (
/) as path separators, for example, sdk/android/README.md.Output file – Only used if Generated API Code is JSON or YAML, that is, the OpenAPI definition itself. Specifies the name of the .json or .yaml file to create, for example, swagger.yaml or petstore.json. This file will be created in the Output Folder.
Enabled – Keep this check box selected for the integration to work. Unselect it to disable the integration temporarily.
Click Create, then Done.
Push to Azure DevOps Services
When you are ready to push your changes, click Sync on the editor toolbar, enter a commit message and click Push. API Hub for Design will generate the specified target (server code, client code, API documentation or an OpenAPI JSON or YAML file) and push it to the configured repository and branch.
Commits are made on behalf of the user associated with the access token. If synchronization fails (for example, due to a permission problem), you will see an integration error at the top of the API Hub for Design Editor.
Generate multiple targets
You can add multiple instances of the integration for different output targets. For example, one for the ASP.NET server, and another for the C# client. You can even push all the targets to the same repository, but be sure to use different Output Folders to avoid conflicts.
Troubleshooting
Integration fails with an error, or the files are not updated in the repository
Make sure the target repository is not empty. If this is a new repository, commit something to it, for example, a README file.
Make sure the integration user has permissions to push to the target repository and branch. This user must be in the Contributors group or must have explicit Contribute and Create Branch permissions in the repository.
Review the access tokens in Azure DevOps Services and make sure the token used with API Hub for Design is active (not expired or revoked) and has the Code (read and write) scope. If the token has expired, generate a new one, and then delete and re-create the integration in API Hub for Design.

Click the image to enlarge it.
Cannot open the integration settings in API Hub for Design ("Failed to connect to Azure DevOps. Please verify your Personal Access Token.")
This means the access token has expired or was revoked. To resolve the issue:
Delete the existing integration in API Hub for Design.
Re-create the integration using the new access token.
Disable the integration
If you no longer want to sync with Azure DevOps Services, you can disable or delete the integration. The existing files will remain in your repository, but API Hub for Design will not update them anymore.