Create API Tests
This topic describes the layout and controls of API Hub for Explore's API Test page.
API Test is a place where you can keep all your related APIs and tests together, making it easier to organize your work. The tests are grouped into Projects. In API Test you can:
Create projects that can be easily shared, allowing you to work together with the other people in your organization.
Connect the API definitions created in API Hub for Design for quick access to the API definition, making it easier to test the API.
Create automatic test cases to validate the server's response, including HTTP headers, the Body, or specific fields in the response.
Organize Test Cases into Test Suites to group them together.
Create Projects
To create tests, click Create Project. Then you have to name your project using the guidelines.
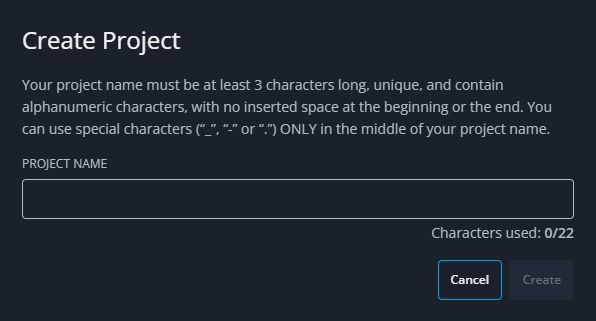 |
You can have multiple projects to ensure the organization of your work according to your needs. Switch between projects by going to ALL PROJECTS.
Manage Projects
Within Projects, you can switch between the sections Details and Collaboration.
Project Details
On the Details page, you can modify things such as:
Project Name. The name of your project, up to 14 characters.
Description. A brief description of your project, up to 250 characters.
Delete Project. By deleting the project you permanently delete its APIs, endpoints, and tests.
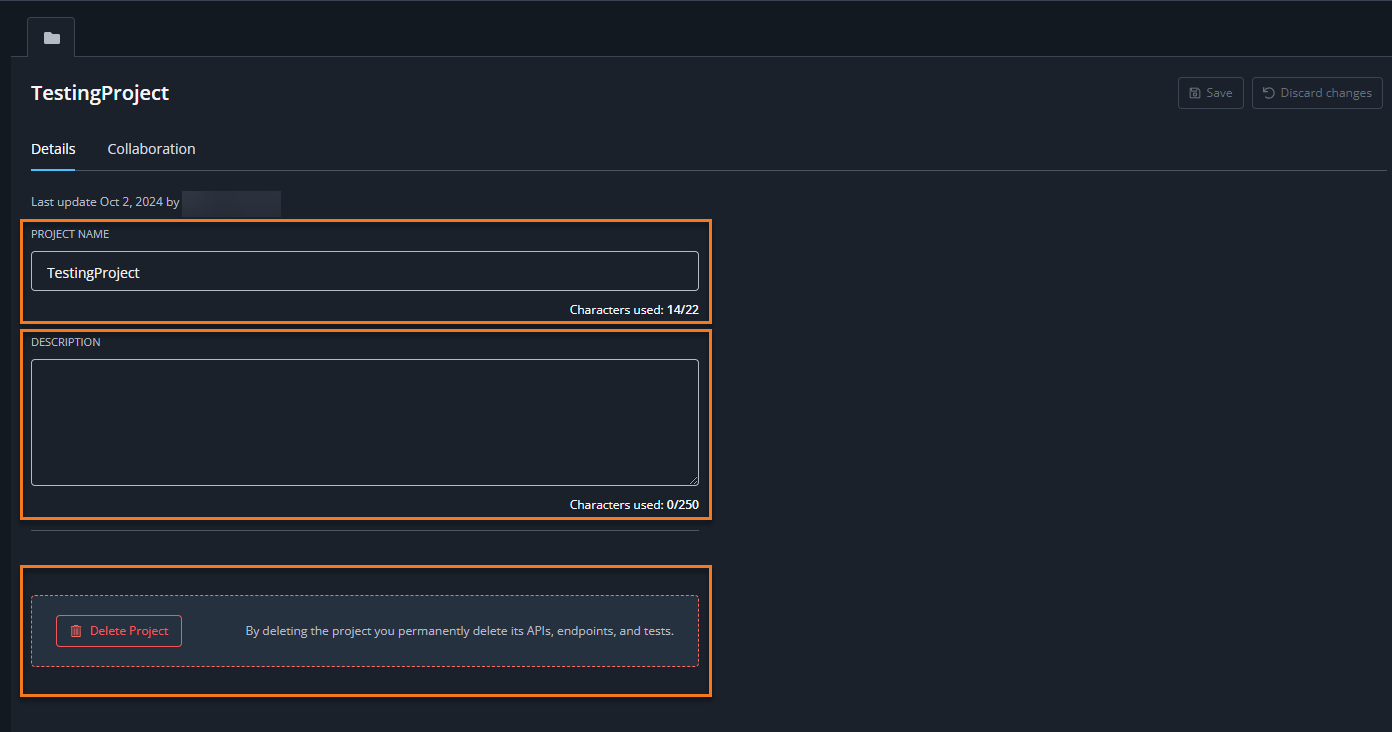
Project Collaboration
On the Collaboration page you can invite other contributors to your project, manage their roles and collaborate with them.
Note
You can invite only people who are a part of your organization.
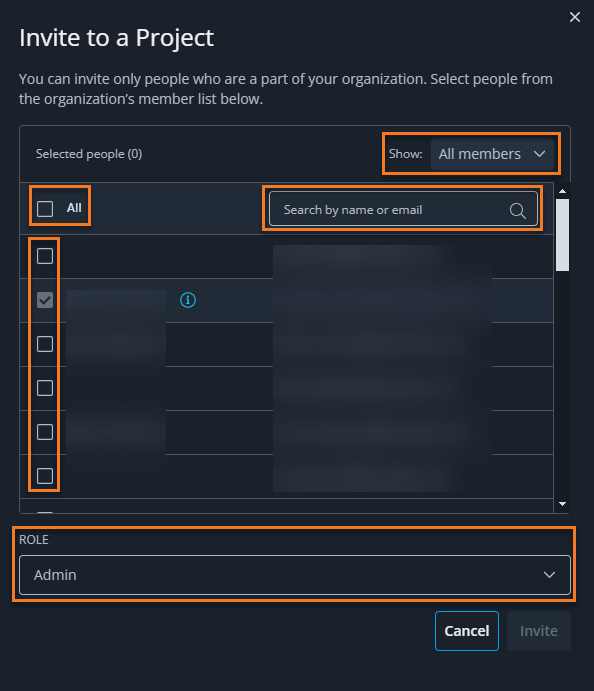
Click Invite to invite new contributors to your project. Then, you can manage your invitations in several ways:
Tick the next to the person's name to invite them or select All to invite everyone within your organization.
Look for a specific user in the Search by name or email bar.
Show All Members or only Selected Members
Select a Role for the user.
Link APIs from API Hub for Design
To begin testing, it is recommended for you to connect the desired APIs. Here's how to connect and manage APIs from API Hub for Design.
To link an API from API Hub for Design to your project, click next to APIs and select the API you want to link. You can filter the APIs by Visibility, Owner, and your own phrases. Select the APIs you want and click Link.
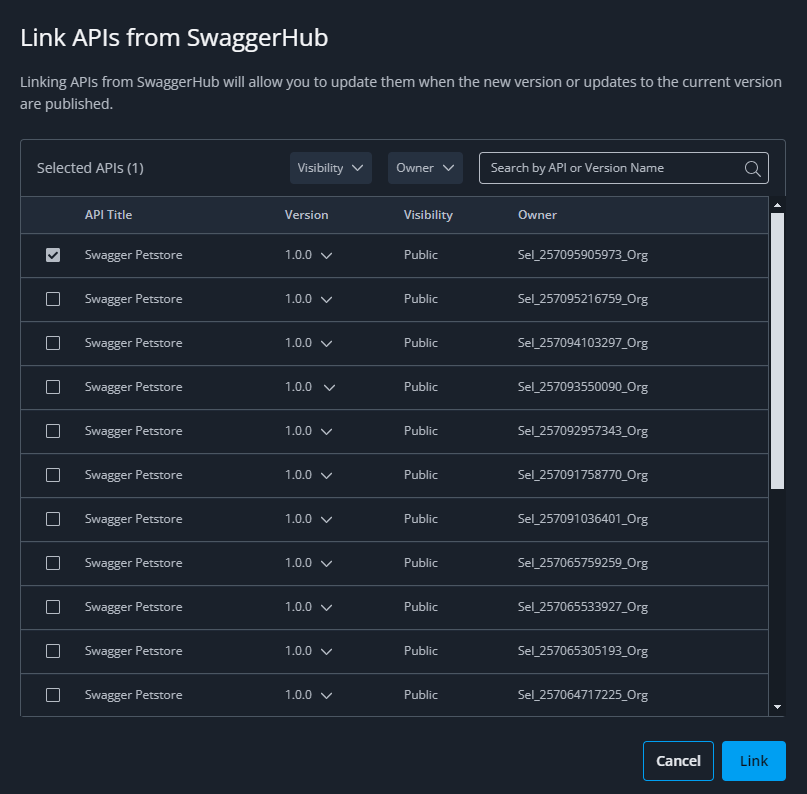 |
API Details
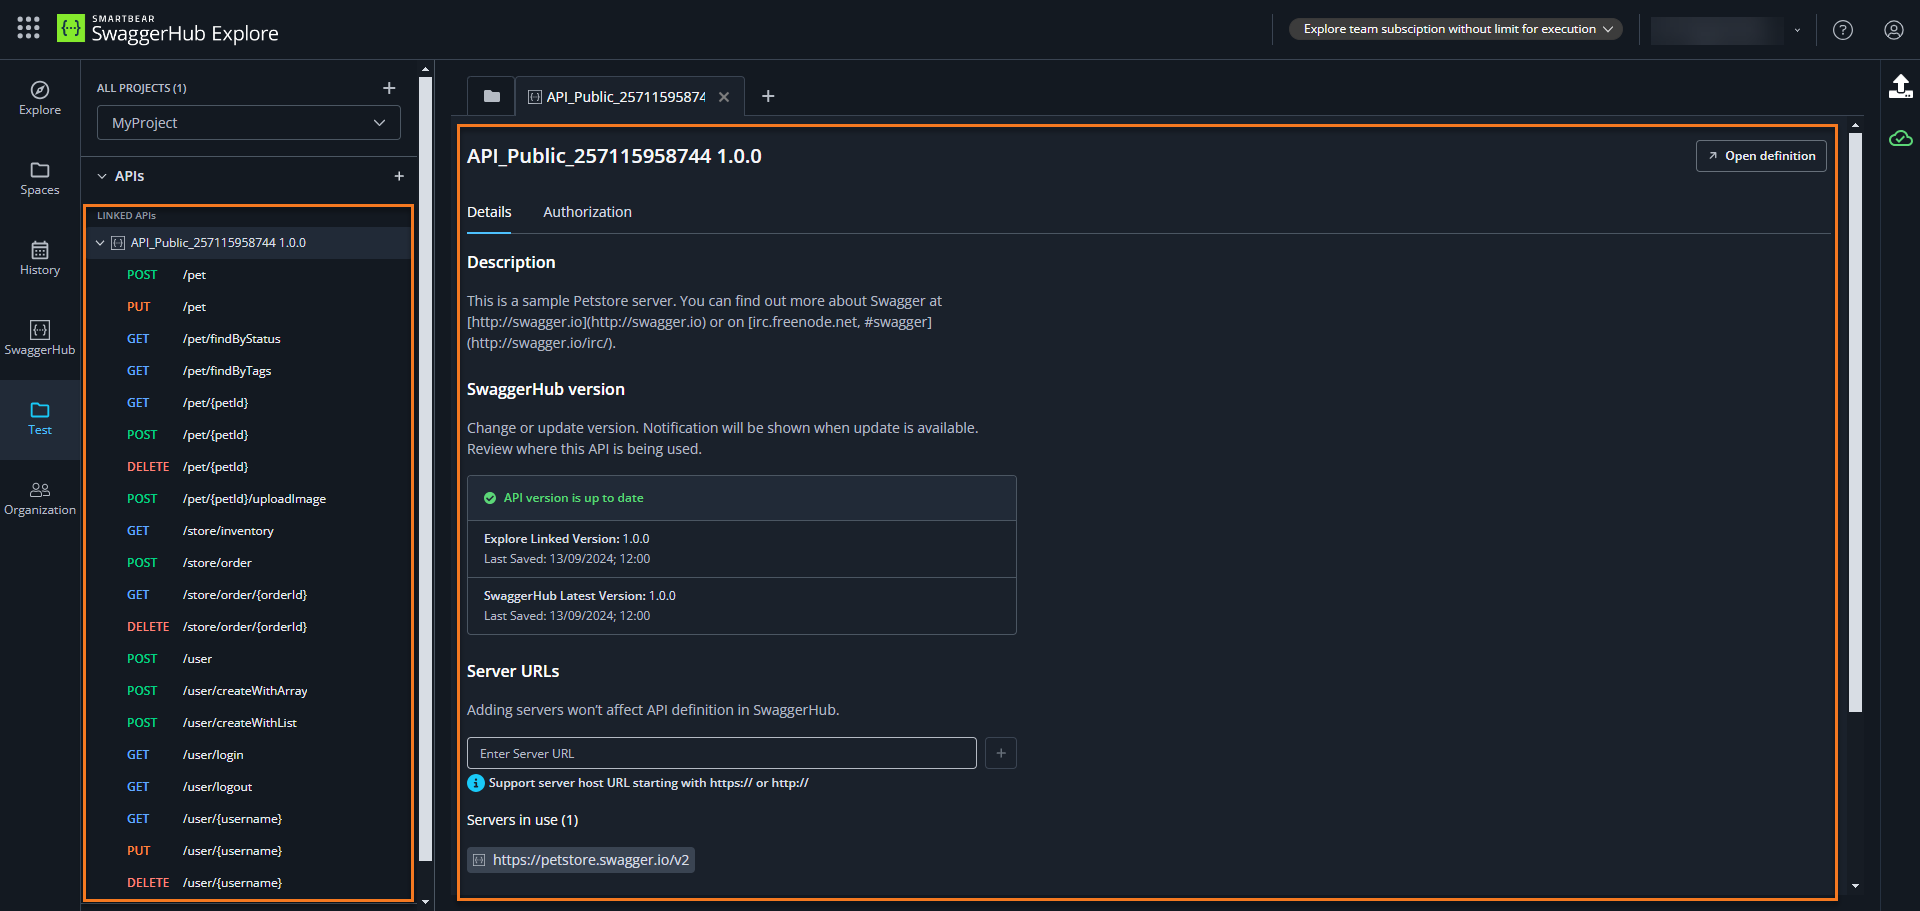
You can see and filter APIs and their details by clicking it in the Linked APIs list. The API details consists of two sections: Details and Authorization. The Details section includes information and options such as:
Description. A brief description of the API.
API Hub for Design version. Here you can change the version. This is because you link your project to a specific version of the API, making it easier to track changes between versions and update your tests accordingly when the API is updated.
Server URLs. Add and/or delete server URLs. To delete a server URL, click next to the server URL. The URLs that are part of the definition on API Hub for Design side can't be deleted in API Hub for Explore. You can delete the URLs which you added previously. Those servers can be used to create Test Steps more quickly, so you won't need to manually re-enter the server name.
Remove API. Click to remove the API link from this testing project.
Click next to the API name to display its endpoints.
 |
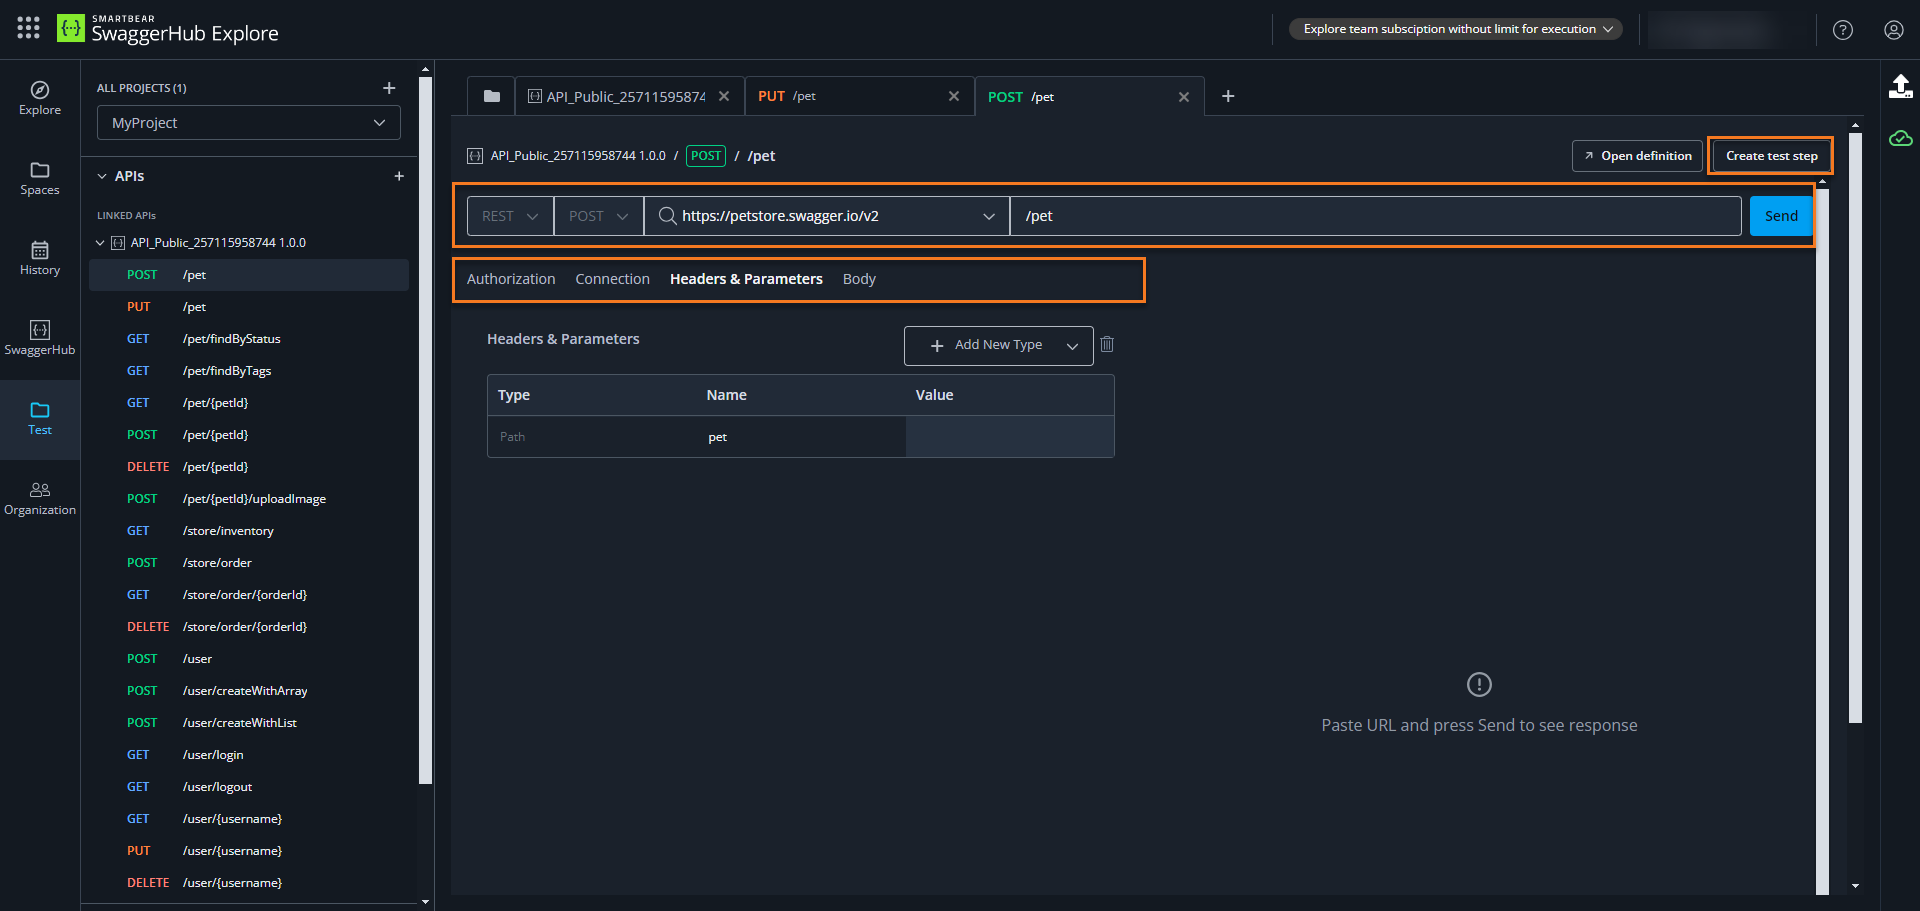
When you click on an operation in the list, its tab will open and you'll be able to edit the Operation Details and also create a Test Step based on the operation by clicking Create test step. You can read more about this layout here.
 |
Create and Manage Tests
You can organize and plan more effectively by creating Test Suites and Test Cases. Test Suites let you group related tests, while Test Cases describe specific scenarios. This makes it easier for you to manage and run tests. The feature helps you create thorough test plans, ensuring complete coverage and making it easier to detect bugs.
In the TESTS section, you can create Test Cases to build your test scenarios.
Test Cases can either stand alone or be organized into folders called Test Suites.
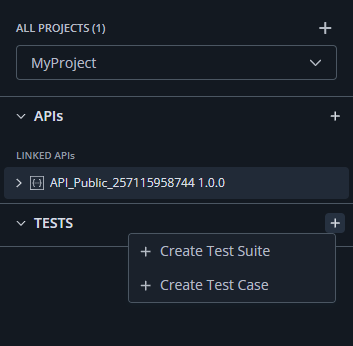
Go to the TESTS section to create new Test Cases and Test Suites. To do that, click next to TESTS and choose Create Test Suite or Create Test Case.
 |
Test Suites
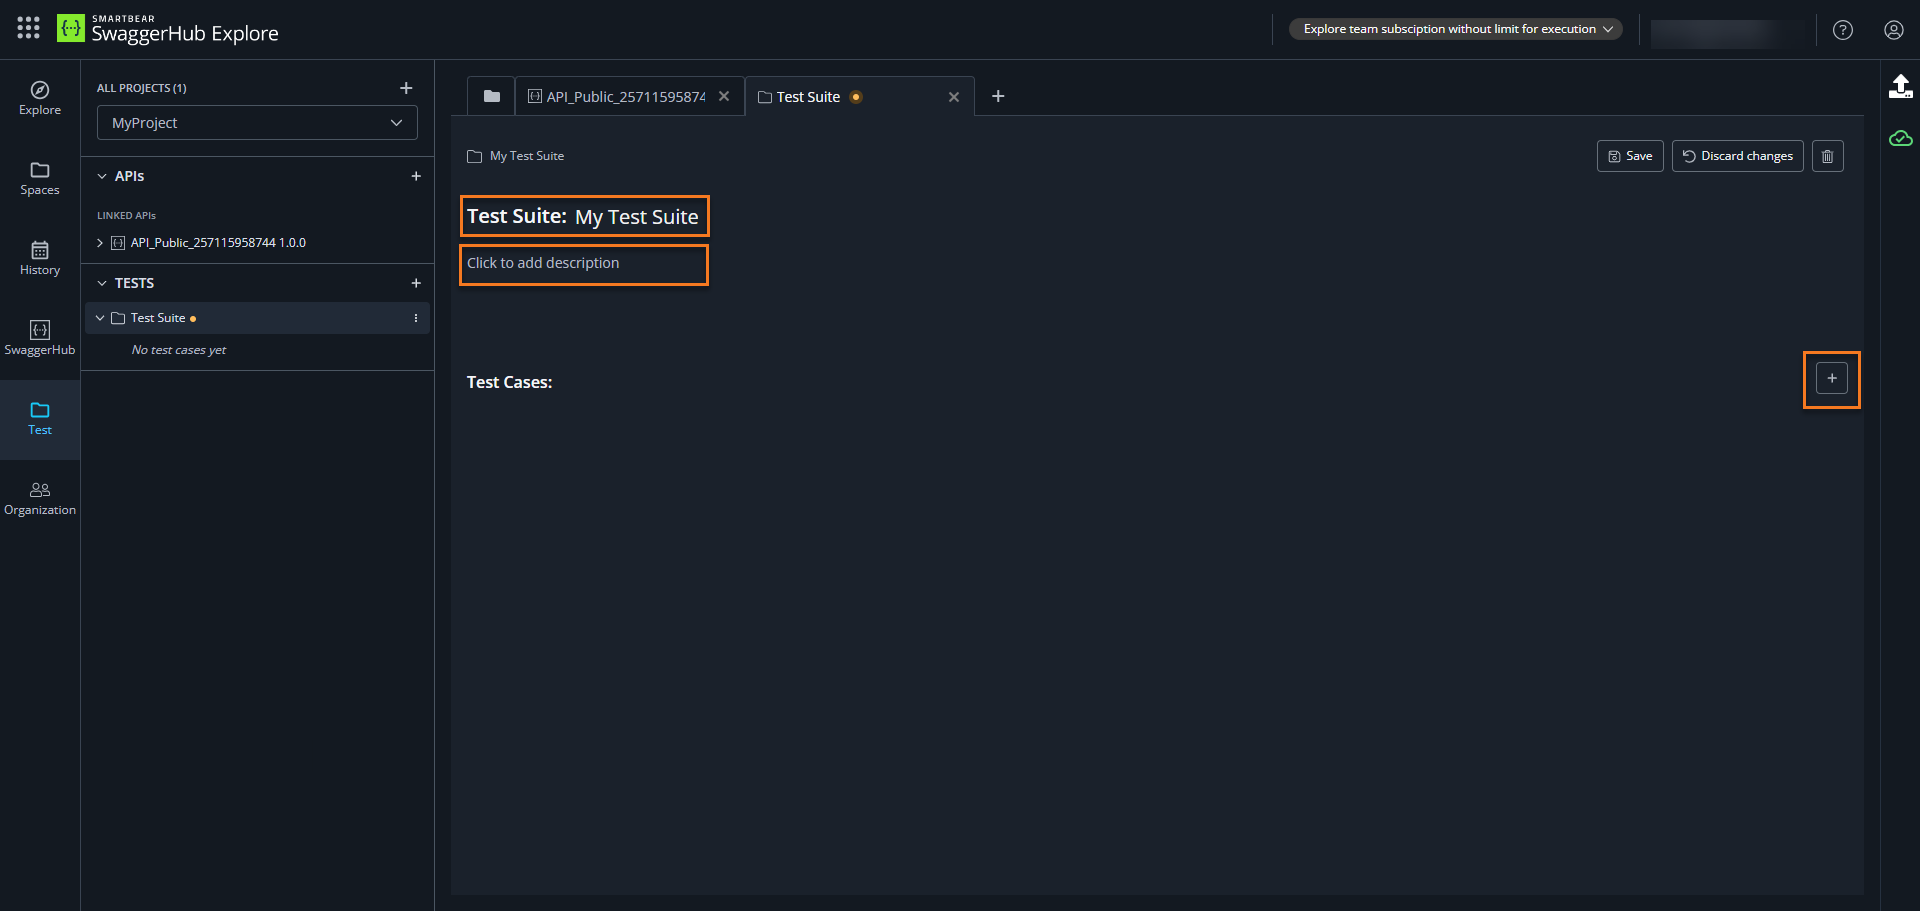
Test Suites are folders for your Test Cases. When creating a Test Suite, you can change its name, description, and also immediately add Test Cases to it by clicking .
 |
Test Cases and Test Steps
You can create new Test Cases in two ways:
Create a Test Case based on the API definition directly from the API endpoint view
Click next to TEST
In the next step, you must create Test Steps within a Test Case. To do that, select an existing API operation or create a new request.
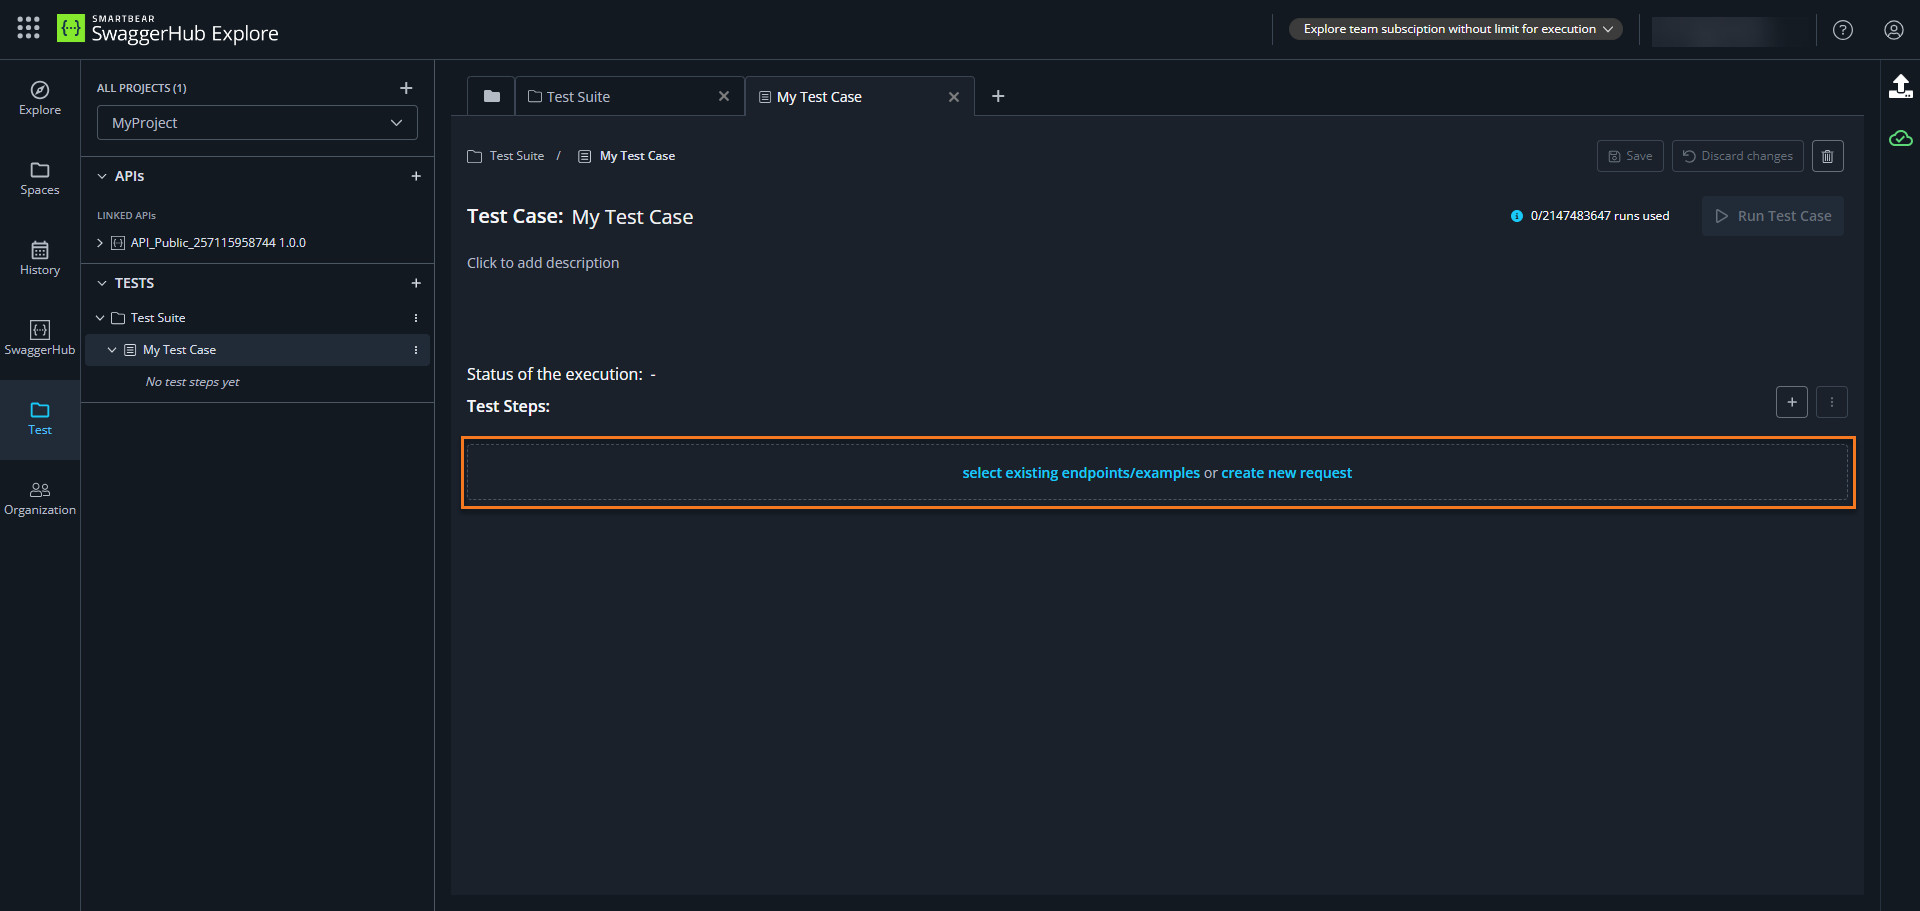 |
Note
You can add up to 20 Test Steps to a Test Case.
When you select an operation to test, a new Test Step will be created with two sections: Request/Response and Assertions.
In the Request/Response section, you can edit and test the Operation Details , where you can specify details of the HTTP request.
Insert the desired Query Parameter and click to run the Test Step or Run Test Case to run the whole Test Case.
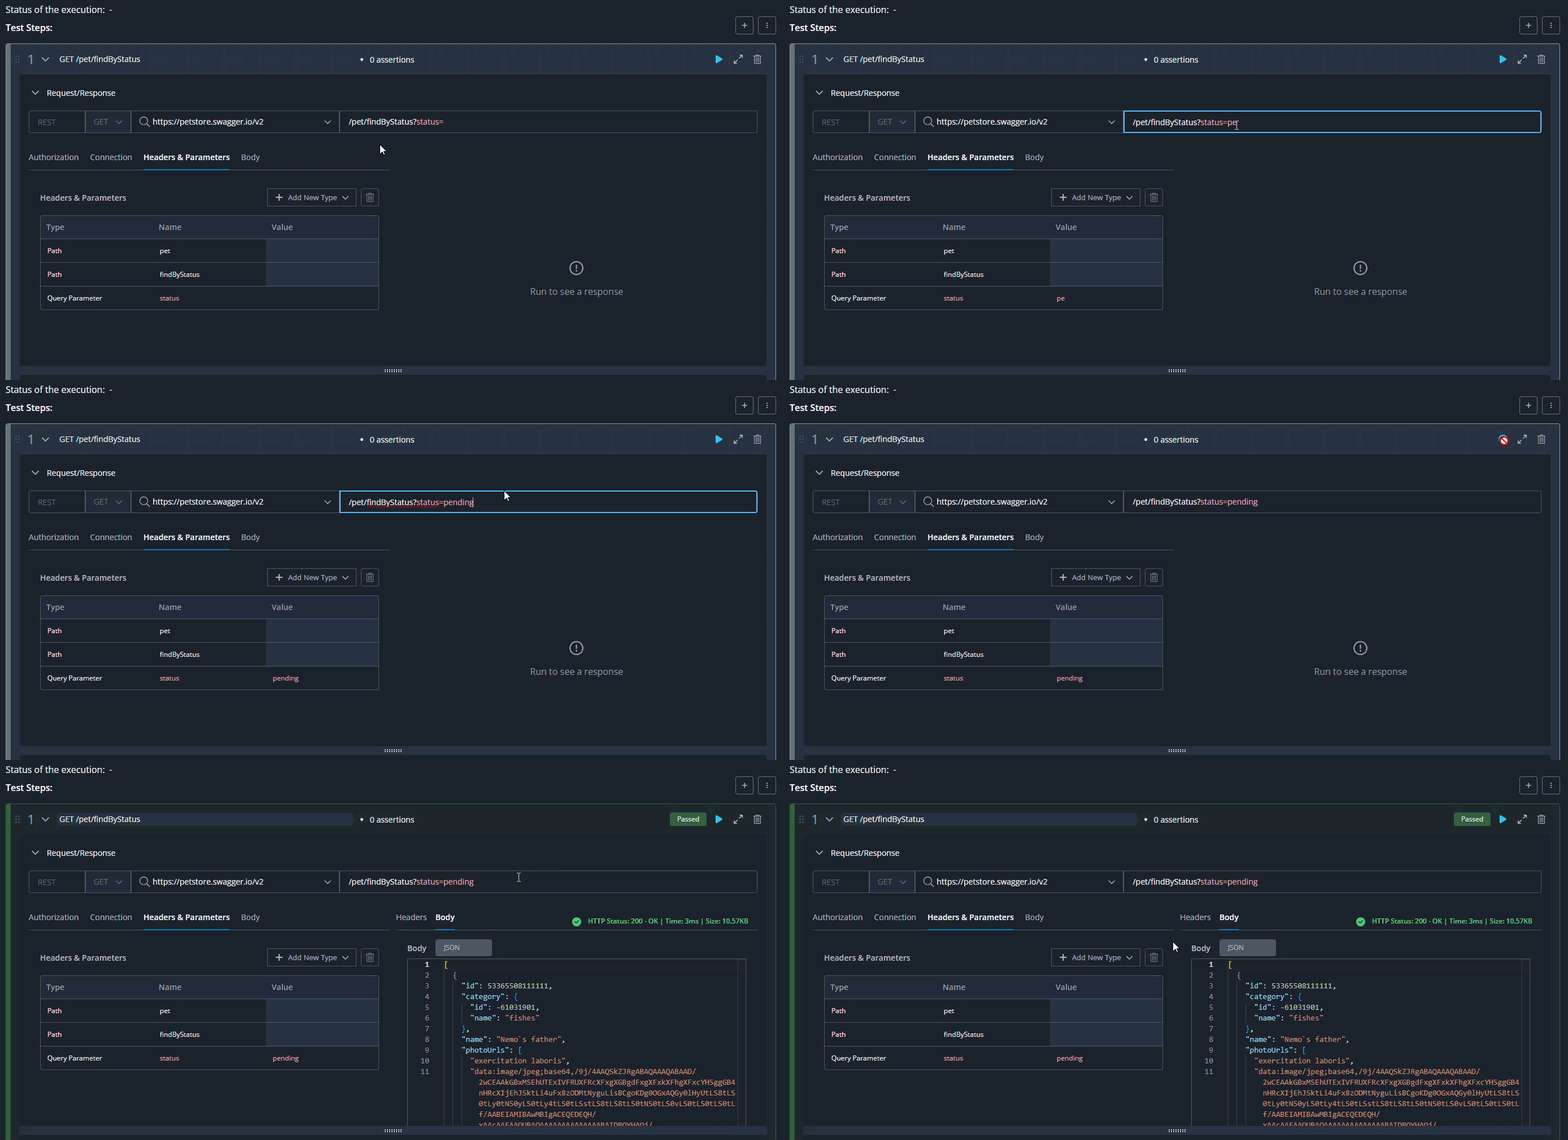 |
Note
The yellow dot icon lets you know that your changes haven't been saved yet.
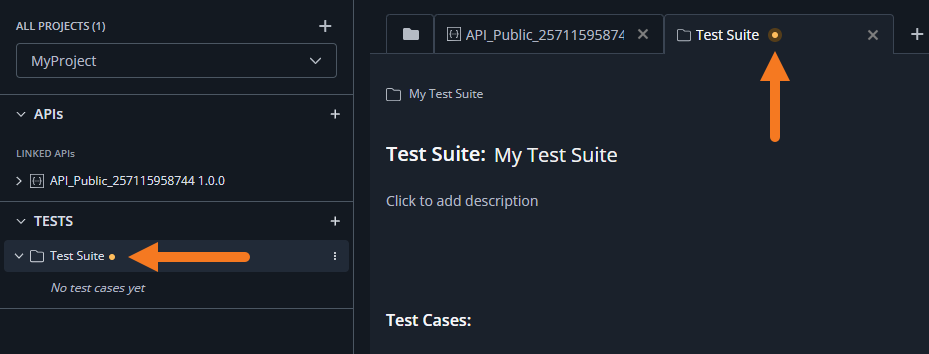 |
Assertions
Assertions allow you to define expected outcomes and automatically verify the accuracy of API responses. By setting up Assertions, you can check response data, status codes, headers, and other parameters against set criteria. This feature ensures reliable and accurate API testing results, helping you quickly spot deviations from expected behavior and troubleshoot issues efficiently.
You can create multiple assertions to validate the API's responses automatically.
Click to add new Assertions.
 |
There are different types of Assertions, and each type requires different data.
It is possible to save Test Cases with incomplete Test Steps or Assertions to allow multiple users to collaborate on creating the Test Case. However, if assertion details are missing or incorrect, such as when the expected value is not provided or an invalid comparison operator is set for the expected value, the test execution will be marked as BLOCKED to indicate issues with the Test Case.
The Test Case will be marked as FAILED when the assertions are correctly defined, but the server response does not meet the criteria specified by the assertions.
Generally, this data isn’t checked when you create the assertions. However, if the data is incorrect during the test execution, it will be marked as BLOCKED, and the test case will be FAILED.
While creating an Assertion, you can modify the following options:
Action. With this option you can Compare and Search for a specific value, and Check if it Exists or Doesn't Exist.
Condition. Here you can compare two values using standard mathematician conditions (>, <, =<, >=, =, !=).
Actual Value. The value returned from the server.
Expected Value. The value you insert and expect to be returned by the server.
Type. The type of the Assertion. See more below.

Currently, we support four Assertion types, and depending on the Assertion type you choose, you can modify various Actions and Conditions:
Status code. An HTTP status code is a three-digit number returned by a web server in response to a request made by a client (like a web browser or an API). These codes indicate whether the request was successful, encountered an error, or requires further action.
They are grouped into different categories:
1xx (Informational): The request is being processed.
2xx (Success): The request was successfully received and processed.
3xx (Redirection): The client must take additional steps to complete the request.
4xx (Client Errors): There was an error with the request from the client.
5xx (Server Errors): The server failed to fulfill a valid request.
This assertion supports making comparisons not only with a single status code but also with a list of them, separated by commas, for example
403,404,405.Note
With this assertion, you can only Compare the code to a specific number, not to an entire status code family.

Response time. It refers to the amount of time (in milliseconds) it takes for a server to respond to a client's request. In web or API interactions, it is the duration between when a request is sent (such as loading a webpage or making an API call) and when the response is received.
This assertion allows you to set an expected response time in milliseconds for API responses. By configuring the expected response time, you can accurately identify the latency of your API, ensuring it meets performance standards and behaves as intended.
The assertion will fail if the server response time is greater than expected.

Header. HTTP headers contain metadata in key-value pairs sent with HTTP requests and responses. They provide extra information about how a request should be processed or how a response should be interpreted. Exchanged between the client (such as a web browser or API client) and the server, headers help define caching rules, manage authentication, and handle session state, enabling developers to fine-tune API behavior and optimize communication.
This assertion enables you to set various conditions for expected header values. By doing so, you can accurately assess the correctness of your API response headers.
You can set up assertions with the actions Check if Exists and Check if Does Not Exist. These assertions will pass or fail based on whether a specific HTTP header is included in the response.
You can set an expected value using the action Search to check if a specific text is Contains or Not Contains in the HTTP header. This search will work like a regular string or text search.
With the action Compare, you can set an expected value using the common comparing conditions (>, <, <=, >=). This will treat both the expected values and the actual values as numbers.
You can also use the action Compare to set an expected value using the following conditions: (=, !=). The tool will evaluate the expected value based on whether it is a string or a number and will compare it against the actual value accordingly.
When you add conditions like >, >=, <, <=, the Expected Value field only accepts numbers. If you enter letters, a validation message will be displayed.
The default coding is UTF-8.

Body. The Body refers to the main content or data that is sent in a message. It contains the information that is being transmitted between the client (like a web browser or API client) and the server.
This assertion allows you to validate strings within the response body of an API call using any search action. You can choose whether the validation is case-sensitive or not, providing you with flexibility regarding expected string results.
You can set up a Body assertion with the actions Check if Exists and Check if Does Not Exist. These will pass or fail based on whether the given HTTP response includes the body or not.
You can set up the action Search with the conditions Contains and Not Contains. This will search the entire body for the text you provided.
You can set up the action Compare with the following conditions: (=, !=). The tool will evaluate the expected value based on whether it is a string or a number and will compare it against the actual value accordingly.
For all encoding purposes, the encoding is determined based on the
Content-Typeheader andcharset(as defined in the HTTP standard), and it is converted to the encoding used before evaluating Compare, and Contains and Not Contains assertions.You can decide if your text search is case-sensitive or not.
You can also use the JSON Path filter. JSON Path is a query language used to navigate through and extract data from JSON (JavaScript Object Notation) documents. It allows you to specify paths to access specific elements or values within a JSON structure. In API Hub for Explore assertions, you can target those specific elements and use the aforementioned actions on them.

You can also toggle every Assertion on and off by clicking and collapse or expand it by clicking .
Test Case Execution
Test Cases are executed sequentially, with each test step running one after the other. The execution process will stop if all steps are completed successfully or if a step is marked as FAILED or gets BLOCKED.
Test Status States
After the tests are completed, they can end with one of four outcomes:
PASSED. The test ran successfully, and it worked as expected.
BLOCKED. The test couldn't run because there is missing data in the test.
FAILED. The test ran, but the tested API didn't work as expected. See Failure Conditions.
ERROR. The test execution couldn't run due to an unexpected error. Please contact support for more details about the error.
See more about the reasons behind each state in Test Case Execution.